
Migrating from WordPress Multisite (MU) to a WordPress standalone installation can be a very frustrating task. Luckily for you, we’ve come up with a step-by-step guide on how do go about doing this.
There are probably many different methods that achieve the same end result, however, the steps below are “tried and tested” and have worked for us without any issues.
Have you tried the WordPress export tool?
If your site is small-to-medium sized, the WordPress export tool usually does a good job of exporting content. In your MU dashboard, simply go to Tools > Export and select “All content”. Then navigate to Tools > Import in your new WordPress installation and select WordPress. Proceed to upload the file from the database export and follow the steps. If this works for you, great, you have just saved yourself a lot of time and frustration! If the Export/Import tools don’t work for you, then you’ll need to follow the steps below.
1. BACKUP, BACKUP, BACKUP
It is always good practice to keep your backups up-to-date. Just one simple error on a live installation and years of data might be lost! In this tutorial we won’t be updating SQL on the live installation, but mistakes do happen. You might run a SQL command on the wrong database for example which would cause havoc! Take this step seriously. While backing up your database be sure to backup your WordPress files as well. Keep your backups in a safe place, far away from where you will be working.
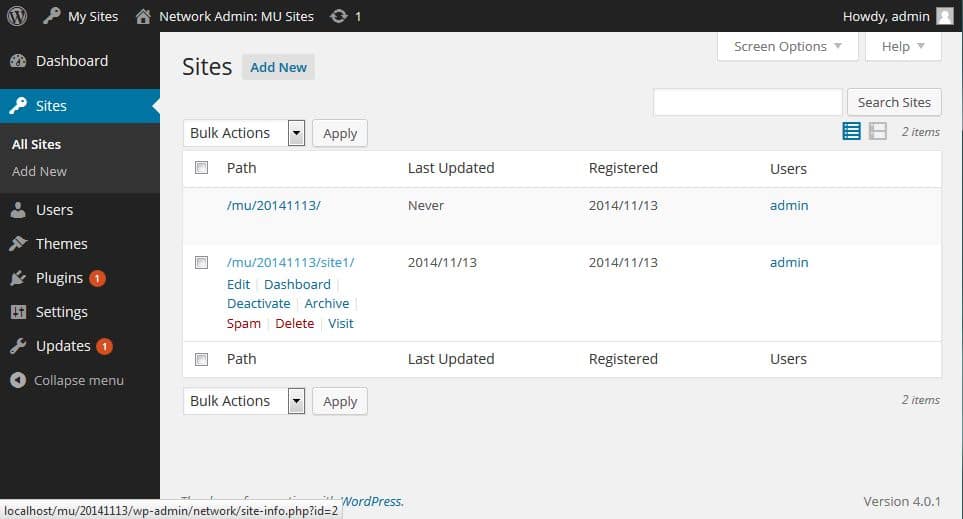
2. Determine the ID of the site that you want to export
WordPress assigns an unique ID for each site contained within a MU installation. The next step is to determine the ID of the site you want to export into a standalone WordPress installation. To get the ID, click on Network Admin > Sites which you will find in the Sites menu in WordPress MU, hover over the site that you want to export, and grab the ID from the URL. Take a look at the screenshot below (note that the ID of our demo site is 2).
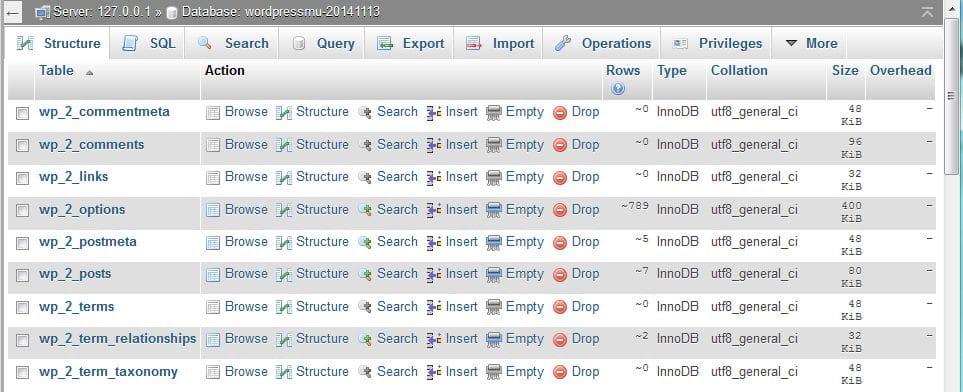
3. Export the relevant database tables
Now that you have the site ID, you will need to go into the MU database (we’ll call this database WordPress_ms_old for future reference) and export the tables. Typically the tables are prefixed wp_siteID (where siteID is the ID of the relevant site). The tables relevant to our demo site are prefixed wp_2 (refer to the screenshot below). Export these tables to a file named export_mu.sql. Note: the other tables are not important for now so you don’t need to worry about exporting them.
4. Install a fresh installation of WordPress
This is where your exported MU site will be hosted. Complete the full WordPress installation process so that the default database tables are created. We’ll call this database WordPress_final for purposes of this tutorial.
5. Rename tables in export_mu.sql
Open export_mu.sql with a text editor and rename the tables in the new WordPress installation. Typically these tables are prefixed with wp_ but we suggest comparing them to what’s in your WordPress_final database. In our example, we have the MU site with ID 2. We are going to rename all wp_2_ in the export file to simply wp_.
6. Edit reference to uploads
MU uploads media files into separate directories based on the site ID. You will need to edit this in export_mu.sql as well. Search for all references to the upload folder in the old site and change it to the new site. For example, search for the path oldsite.ms/wp-content/uploads/sites/ID/ and change it to newsite.wp/wp-content/uploads/.
7. Drop tables in WordPress_final
Warning: make sure you are working in the WordPress_final database!!! In this step we need to replace the WordPress tables in WordPress_final with the contents of export_mu.sql. In the WordPress_final database (make sure that it’s the new installation) drop all tables except wp_usermeta and wp_users.
8. Import export_mu.sql
Import the updated export_mu.sql file. This will pull all the content from the MU site into the new installation. We’re nearly there!! Shew!
9. List users that need to be recreated
In the old WordPress_ms_old database, run the following SQL command to determine which users need to be recreated in the new WordPress installation.
SELECT u.ID as ID, u.user_login as User FROM wp_ID_posts as p JOIN wp_users as u ON p.post_author = u.ID GROUP BY u.ID
10. Re-create users
You will need to manually recreate the users that were listed in point 9 in your new WordPress installation. There are ways to do this with SQL exports from the old database but we had better results by doing this manually. Go to the Users area from the dashboard in your new WordPress installation and manually create each of the users listed in point 9.
11. Map the new user IDs to old content
In the new WordPress database you will notice that post_author still references the old user_id in the wp_posts table. This needs to be fixed for every user created in point 10. You can get the “NewID” (new user_id) by hovering over the edit link next to each user in the Users menu in the WordPress dashboard. Run the following SQL command for each user:
UPDATE wp_posts SET wp_posts.post_author = "NewID" WHERE wp_posts.post_author = “oldID”
12. Move content files
The last step is to copy the files located in wp-content/uploads/sites/ID/ of the MU installation to wp-content/uploads/ in your new installation.
And there you have it! Our simple steps for migrating WordPress Multisite to a standalone WordPress installation. Do you have any other tips and tricks? Then please leave us a comment below.